Google雲與網頁設計

1. 課程介紹

一、響應式(RWD)網頁介紹

  1. 響應式網頁設計(Responsive Web Design),網站會自動針對不同瀏覽媒介(桌上型電腦、筆記型電腦、平板、手機)的螢幕尺寸,進行內容調整而以最佳瀏覽(排版)的方式呈現。
  2. 需求,Internet Explorer 9 以上,Chrome、Firefox、Opera、Safari則使用最新版本即可
  3. 開發成本與時間比網頁APP低
  4. 不需要下載APP就能使用
  5. 維護成本比APP低
  6. 利於SEO(搜尋引擎最佳化)
  7. 但小尺寸螢幕不適合複雜的功能或介面

二、Bootstrap安裝

  1. 由Twitter所開發
  2. 採模組化設計
  3. 官網:http://getbootstrap.com/
    中文:https://kkbruce.tw/bs3/
  4. Bootstrap框架

三、導航列與輪播圖

  1. Bootstrap:超過數十個可重覆使用的元件建置,元件有符號圖示(Glyphicons)、下拉選單、輸入框(Input)群組、導覽、警告視窗等等許多功能。
  2. JavaScript:內含13個JQuery外掛,外掛有提示(tooltip)、彈出視窗(popover)、對話視窗(modal)等具互動性的元件。
  3. backstretch 一個簡單的jQuery插件,它允許你動態調整大小,幻燈片功能的背景圖像添加到任何頁面或元素

    官網:http://srobbin.com/jquery-plugins/backstretch/

四、Google雲與網頁設計應用

  1. Google表單
  2. Google文件
  3. Google地圖
  4. youtube影音
  5. 將專案資料夾上傳遠端伺服器 https://www.ugm.com.tw/tncomu/20160824/index.html

五、利用Google雲免費傳真文件

六、台南社大本學期開課

  1. 網站程式設計-PHP:8/23 已報名21人,剩9個名額
  2. 上課時間:每週三 晚上07:00~09:50 第一次上課日期:09 月 07 日
  3. 開課地點:台南社區大學(台南市公園路750號)

Google雲與網頁設計

1-2 Bootstrap 下載與安裝

  1. 下載:https://github.com/twbs/bootstrap/releases/download/v3.3.7/bootstrap-3.3.7-dist.zip
  2. 將下載檔案解壓縮,並將其中 css、js、fonts 複製至專案資料夾,這樣就算安裝完成。
  3.  套用框架:https://kkbruce.tw/bs3/GettingStarted
    <!DOCTYPE html>
    <html lang="zh-Hant">
      <head>
        <meta charset="utf-8">
        <meta http-equiv="X-UA-Compatible" content="IE=edge">
        <meta name="viewport" content="width=device-width, initial-scale=1">
        <title>Bootstrap 101 Template</title>
    
        <!-- Bootstrap -->
        <link href="css/bootstrap.min.css" rel="stylesheet">
    
        <!-- HTML5 shim and Respond.js 讓 IE8 支援 HTML5 元素與媒體查詢 -->
        <!-- 警告:Respond.js 無法在 file:// 協定下運作 -->
        <!--[if lt IE 9]>
          <script src="https://oss.maxcdn.com/html5shiv/3.7.2/html5shiv.min.js"></script>
          <script src="https://oss.maxcdn.com/respond/1.4.2/respond.min.js"></script>
        <![endif]-->
      </head>
      <body>
        <h1>Hello, world!</h1>
    
        <!-- jQuery (Bootstrap 所有外掛均需要使用) -->
        <script src="https://ajax.googleapis.com/ajax/libs/jquery/1.11.1/jquery.min.js"></script>
        <!-- 依需要參考已編譯外掛版本(如下),或各自獨立的外掛版本 -->
        <script src="js/bootstrap.min.js"></script>
      </body>
    </html>
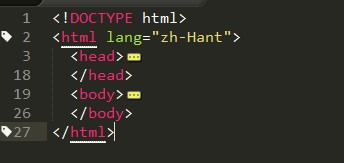
  4. HTML5的架構

    第一行:HTML5 的 DOCTYPE宣告。
    第二行:lang="zh-Hant" 設定網頁為繁體中文語系
    html 標籤包含 head、body
    <meta charset="UTF-8">設定網頁的文字編碼
  5. 常用的網頁標籤元素
    1. h1~h6:標題
    2. ol、ul:有序列表、無序列表
    3. <p></p>:段落
    4. <div> </div>:區塊
    5. <!--  -->:註解
    6. <iframe src="要嵌入的網頁網址" style="width:100%;height:1000px;"></iframe>:內嵌入另外一個網頁
  6. 常用的網頁標籤屬性
    1. id:唯一
    2. class:可重覆
    3. style:設定css


Google雲與網頁設計

1-3 Bootstrap 導航列

  1. 導航列:https://kkbruce.tw/bs3/Components#navbar
     
  2. 整理後的導航列框架:
    
        <nav class="navbar navbar-default" role="navigation">
          <div class="container">
            <!-- Brand and toggle get grouped for better mobile display -->
            <div class="navbar-header">
              <button type="button" class="navbar-toggle collapsed" data-toggle="collapse" data-target="#bs-example-navbar-collapse-1">
                <span class="sr-only">Toggle navigation</span>
                <span class="icon-bar"></span>
                <span class="icon-bar"></span>
                <span class="icon-bar"></span>
              </button>
              <a class="navbar-brand" href="index.html">育將電腦工作室</a>
            </div>
    
            <!-- Collect the nav links, forms, and other content for toggling -->
            <div class="collapse navbar-collapse" id="bs-example-navbar-collapse-1">
              <ul class="nav navbar-nav navbar-right">
                <li><a href="index.html">首頁</a></li>
                <li><a href="http://ccs.tncomu.tw/index.php"  target="_blank">台南社大105學期課程</a></li> 
                <li><a href="http://ccs.tncomu.tw/modules/ccs_course/index.php?op=view_course&course_sn=5987" target="_blank">網站程式設計-PHP</a></li>
    
                <li><a href="contact_us.html">聯絡我們</a></li>
                <li><a href="about_us.html">關於我們</a></li>
                <li><a href="maps.html">電子地圖</a></li>
                <li><a href="youtube.html">HTML教學</a></li>
                
              </ul>
            </div><!-- /.navbar-collapse -->
          </div><!-- /.container-fluid -->
        </nav>


Google雲與網頁設計

1-3-1 圖片輪播

一、下載套件:

https://raw.githubusercontent.com/srobbin/jquery-backstretch/master/jquery.backstretch.min.js

將上列存至 class/backstretch/

二、引入套件:

<script src="class/backstretch/jquery.backstretch.min.js"></script>

三、設定
 

  1. 若無圖片可至這裡下載合法使用的圖片:https://pixabay.com/
  2. <script type="text/javascript">
      $(document).ready(function(){
        $('.top-content').backstretch([
           "img/3.jpg"
         , "img/2.jpg"
         , "img/1.jpg"
         ], {duration: 3000, fade: 750});
      });
    </script>


四、HTML


    <div class="top-content" style="height:560px;">
    </div>

五、修正與導航的內距

 style="margin-bottom:0px;"


Google雲與網頁設計

1-4 GOOGLE雲與網頁設計

  1. 請先登入gmail.com 或google
  2. https://drive.google.com/drive/my-drive

Google雲與網頁設計

1-4-1 Google表單

  1. 用Google表單建立「聯絡我們」姓名、電話、email、內容
  2. 建立問題
  3. 建立excel,回覆
  4. 調色盤,改變外觀
  5. 取得嵌入碼:「傳送」
  6. 網頁標題:
    <h1 class="text-center">聯絡我們<h1>

    class="text-center" 是置中對齊

  7. bootstrap容器:
    <div class="container">    
    </div>


Google雲與網頁設計

1-4-2 Google文件

  1. 範本:https://docs.google.com/document/d/1-xVAMmvNq4Rbt1IhTH9y2XmMamKtOP9_qCw7QvGjWdA/edit
  2. 開放權限:「檔案/共用/進階」
  3. 取得內嵌碼:「檔案/發佈至網路/內嵌」
    <iframe src="https://docs.google.com/document/d/1-xVAMmvNq4Rbt1IhTH9y2XmMamKtOP9_qCw7QvGjWdA/pub?embedded=true"></iframe>

    增加屬性 style="width:100%;height:500px;"

  4. 使用bootstrap的框架容器
    
        <div class="container">
        </div>

    bootstrap 文字置中:class="text-center"

Google雲與網頁設計

1-4-3 Google地圖

  1. Google Maps:https://www.google.com.tw/maps?source=tldsi&hl=zh-TW
  2. 搜尋:台南市永康區大灣路158號
  3. 「分享/嵌入地圖」:得到嵌入碼
    <iframe src="https://www.google.com/maps/embed?pb=!1m18!1m12!1m3!1d3672.3824860459044!2d120.26708981437422!3d23.009724422583535!2m3!1f0!2f0!3f0!3m2!1i1024!2i768!4f13.1!3m3!1m2!1s0x346e70df506d2875%3A0x8f39feb5f0312841!2zNzEw5Y-w5Y2X5biC5rC45bq35Y2A5aSn54Gj6LevMTU46Jmf!5e0!3m2!1szh-TW!2stw!4v1471956505024" style="width:100%;height:500px;"  frameborder="0" style="border:0" allowfullscreen></iframe>


  4. style="width:100%;height:500px;"

Google雲與網頁設計

1-4-4 youtube影音

  1. 來源:https://www.youtube.com/watch?v=w70oltepxXo
  2. 嵌入語法:「分享/嵌入」
    <iframe width="560" height="315" src="https://www.youtube.com/embed/w70oltepxXo" frameborder="0" allowfullscreen></iframe>
        <h1 class="text-center">HTML教學</h1>
        <div class="container text-center">
          <iframe width="560" height="315" src="https://www.youtube.com/embed/w70oltepxXo" frameborder="0" allowfullscreen></iframe> 
        </div>


Google雲與網頁設計

1-5 利用google雲免費傳真

  1. 登入「Google 雲端硬碟」
  2. 「新增/更多/連結更多應用程式」
  3. 輸入「hellofax」然後安裝
  4. 傳真文件