一、關於本課程
二、開發工具
三、網頁伺服器
申請 GitHub
安裝 GitHub DeskTop
二、設定Git
git config --global user.name "tawan158" git config --global user.email "tawan158@ugm.com.tw"
--global 代表全域設定
git config --list
git config --global color.ui true
三、Windows 提示字元操作
一、資料夾架構
二、Git操作
…or create a new repository on the command line echo "# test" >> README.md git init git add README.md git commit -m "first commit" git remote add origin https://github.com/tawan158/test.git git push -u origin master
…or push an existing repository from the command line git remote add origin https://github.com/tawan158/test.git git push -u origin master
git add . git commit -m "1" git push origin master
一、建立網頁檔案,上傳至github
<h1>~<h6>標題 <p>段落</p> <div>區域</div> <pre>程式碼</pre> <ol>有序清單</ol><ul>無序清單</ul> <table></table> -------------------------------------------------- <a>連結</a> <br />換行 <img />圖片 <span>區域</span>
<!DOCTYPE html> <html lang="en"> <head> <meta charset="UTF-8"> <title>練習5-1</title> </head> <body> <h1>練習5-1</h1> <p>Lorem ipsum dolor sit amet, consectetur adipisicing elit, sed do eiusmod tempor incididunt ut labore et dolore magna aliqua. Ut enim ad minim veniam, quis nostrud exercitation ullamco laboris nisi ut aliquip ex ea commodo consequat. Duis aute irure dolor in reprehenderit in voluptate velit esse cillum dolore eu fugiat nulla pariatur. Excepteur sint occaecat cupidatat non proident, sunt in culpa qui officia deserunt mollit anim id est laborum.</p> <p>Lorem ipsum dolor sit amet, consectetur adipisicing elit, sed do eiusmod tempor incididunt ut labore et dolore magna aliqua. Ut enim ad minim veniam, quis nostrud exercitation ullamco laboris nisi ut aliquip ex ea commodo consequat. Duis aute irure dolor in reprehenderit in voluptate velit esse cillum dolore eu fugiat nulla pariatur. Excepteur sint occaecat cupidatat non proident, sunt in culpa qui officia deserunt mollit anim id est laborum.</p> </body> </html>
<!DOCTYPE html> <html lang="en"> <head> <meta charset="UTF-8"> <title>練習5-2</title> </head> <body> <h1>練習5-2</h1> <h2>練習5-2</h2> <h3>練習5-2</h3> <h4>練習5-2</h4> <h5>練習5-2</h5> <h6>練習5-2</h6> 練習5-2 <p>練習5-2</p> <div>練習5-2</div><div>練習5-2</div> <span>練習5-2</span><span>練習5-2</span> </body> </html>
5-3.html :請自行至 tw.yahoo.com 複制一段標題與段落
<!DOCTYPE html> <html lang="en"> <head> <meta charset="UTF-8"> <title>練習5-3</title> </head> <body> <h1>MLB/為了這一分 他受盡了苦難</h1> <p>紅雀隊今天以1比2輸給小熊隊,不過紅雀隊攻下的唯一1分,可是Stephen Piscotty歷經各種苦難之後拿下來的。</p> <p>紅雀隊今天遭到小熊隊強投Jake Arrieta的全力封鎖,打擊無法發揮。5局下Piscotty被Arrieta投出的球擊中右手肘上一壘,接著Arrieta暴投,Piscotty衝上二壘時,又被捕手Willson Contreras的傳球打到另一隻手的手肘。</p> </body> </html>
<!DOCTYPE html> <html lang="en"> <head> <meta charset="UTF-8"> <title>首頁</title> </head> <body> <h1>首頁</h1> <ul> <li><a href="5-1.html">練習5-1</a></li> <li><a href="5-2.html">練習5-2</a></li> <li><a href="5-3.html" target="_blank">練習5-3</a></li> </ul> </body> </html>
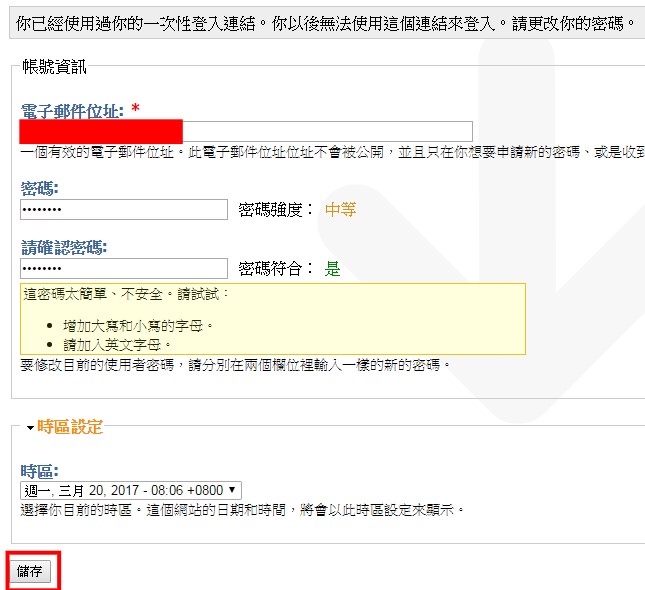
5-4.html :練習插入圖片,請先將上面圖片下載至專案 img/ex5.png
這裡需了解「圖片放置位置」「網頁檔案位置」之間的關係
<!DOCTYPE html> <html lang="en"> <head> <meta charset="UTF-8"> <title>練習5-4</title> </head> <body> <h1>插入圖片</h1> <div><img src="img/ex5.png"></div> </body> </html>
<!DOCTYPE html> <html lang="en"> <head> <meta charset="UTF-8"> <link rel="stylesheet" type="text/css" href="css/style.css"> <title>7-1</title> </head> <body> <table border="1"> <tr> <td> 留白 padding </td> </tr> </table> </body> </html>
style.css
td{ /*註解*/ /*padding: 30px 160px;*/ /* padding-top:10px; padding-right:20px; padding-bottom:30px; padding-left:40px;*/ padding: 10px 20px 30px 40px; /*border:solid 10px #1a3f70;*/ border-width:10px; border-color: #000; border-top-style: dotted; border-left-style: double; }
<!DOCTYPE html> <html lang="en"> <head> <meta charset="UTF-8"> <link rel="stylesheet" type="text/css" href="css/style.css"> <title>7-2</title> </head> <body> <table> <tr> <td> <!-- 註解 --> 留白 padding </td> </tr> </table> <div class="d1"> </div> <div id="d2"> </div> </body> </html>
style.css
td{ /*註解*/ /*padding: 30px 160px;*/ /* padding-top:10px; padding-right:20px; padding-bottom:30px; padding-left:40px;*/ padding: 10px 20px 30px 40px; /*border:solid 10px #1a3f70;*/ border-width:10px; border-color: #000; border-top-style: dotted; border-left-style: double; } .d1{ width: 100px; height: 100px; background-color: #34701a; margin: 20px; } #d2{ width: 500px; height: 500px; background-color: #af7de0; }
<!DOCTYPE html> <html lang="en"> <head> <meta charset="UTF-8"> <link rel="stylesheet" type="text/css" href="css/style.css"> <title>練習5-5</title> </head> <body> <h1>padding</h1> <table border=1> <tr> <td>內邊距</td> </tr> </table> <div class="d1"> </div> <div class="d2"> </div> </body> </html>
td{ /*padding: 100px;*/ padding-left: 50px; padding-top: 20px; padding-bottom: 20px; padding-right: 20px; } .d1{ background-color: red; border: solid black 2px; margin: 30px; padding: 20px; width: 50%; height: 300px; } .d2{ background-color: #188417; border: solid #2112CD 10px; margin: 60px; padding: 20px; width: 50%; height: 100px; }
<!DOCTYPE html> <html lang="en"> <head> <meta charset="UTF-8"> <link rel="stylesheet" type="text/css" href="css/style7.css"> <title>練習7-1 自定義盒子模式</title> </head> <body> <div class="container"> <div class="bd"> <div class="pd"> <div class="content"> 練習7-1 自定義盒子模式 </div> </div> </div> </div> </body> </html>
body{ margin: 0; } .container{ width: 500px; height: 200px; background-color: #1E0CB9; padding: 20px; } .bd{ border: solid 20px #D82323; background-color: #15DF27; } .pd{ background-color: #EFE41B; padding: 20px; } .content{ background-color: #fff; height: 100px; padding: 10px; }
<!DOCTYPE html> <html lang="en"> <head> <meta charset="UTF-8"> <link rel="stylesheet" type="text/css" href="css/style7-2.css"> <title>7-2.html</title> </head> <body> <div class="head"> <div class="nav"></div> </div> <div class="body"> <div class="slider"> </div> <div class="content"> </div> <div class="footer"> <div class="footer-content"></div> <div class="footer-nav"></div> </div> </div> </body> </html>style7-2.css
*{ margin: 0; padding: 0; } .head{ height: 50px; background-color: #000; } .nav{ width: 75%; height: 50px; margin: 0 auto; background-color: #0000FF; } .body{ /*background-color: #82EED9;*/ } .slider{ width: 75%; margin: 0 auto; height: 300px; background-color: #FFFF00; }
三、設定跳轉至「/new-age」
<!DOCTYPE html> <html> <head> <meta http-equiv="refresh" content="0;url=new-age/index.html" /> </head> </html>
四、佈署完成,接下來,請將「github/site/new-age」在「sublime text」開一個專案,準備修改網頁
一、整體架構
二、修改index.html
三、複製index.html
四、嵌入google 表單
一、查出圖片大小
二、處理「最新消息」的說明
三、處理「最新消息」的首頁「摘要新聞」
四、設計獨立新聞頁面
參考網站:https://www.w3schools.com/cssref/css3_pr_background.asp
codepen:https://codepen.io/pen/
一、背景顏色:background-color
background-color: red; background-color: #000; background-color: rgb(0,0,255); background-color: rgba(0,0,255,0.1);
二、背景圖:background-image
background-image: url("http://bootstrap.ugm.com.tw/img/bg/paper.gif");
三、背景重複:background-repeat
background-image:url(http://bootstrap.ugm.com.tw/img/bg/paper.gif); background-repeat: no-repeat;
background-image:url(http://bootstrap.ugm.com.tw/img/bg/paper.gif); background-repeat: repeat-x;
background-image:url(http://bootstrap.ugm.com.tw/img/bg/paper.gif); background-repeat: repeat-y;
background-image:url(http://bootstrap.ugm.com.tw/img/bg/paper.gif); background-repeat: repeat;
四、背景位置:background-position
background-position 屬性是用來指定背景圖案的位置。它的值可以是:
五、背景附件:background-attachment
六、CSS3背景:https://www.w3schools.com/css/css3_backgrounds.asp
七、漸層的背景產生器:https://testdrive-archive.azurewebsites.net/graphics/cssgradientbackgroundmaker/
一、優等網站
二、甲等網站
三、一般網站
四、其他
五、加分題
一、HTML
<!DOCTYPE html> <html lang="en"> <head> <meta charset="UTF-8"> <title>20160626 瀑布流</title> <!-- Latest compiled and minified CSS --> <link rel="stylesheet" href="https://maxcdn.bootstrapcdn.com/bootstrap/3.3.7/css/bootstrap.min.css" integrity="sha384-BVYiiSIFeK1dGmJRAkycuHAHRg32OmUcww7on3RYdg4Va+PmSTsz/K68vbdEjh4u" crossorigin="anonymous"> <!-- Optional theme --> <link rel="stylesheet" href="https://maxcdn.bootstrapcdn.com/bootstrap/3.3.7/css/bootstrap-theme.min.css" integrity="sha384-rHyoN1iRsVXV4nD0JutlnGaslCJuC7uwjduW9SVrLvRYooPp2bWYgmgJQIXwl/Sp" crossorigin="anonymous"> <!-- jQuery --> <script src="https://ajax.googleapis.com/ajax/libs/jquery/1.12.4/jquery.min.js"></script> <!-- Latest compiled and minified JavaScript --> <script src="https://maxcdn.bootstrapcdn.com/bootstrap/3.3.7/js/bootstrap.min.js" integrity="sha384-Tc5IQib027qvyjSMfHjOMaLkfuWVxZxUPnCJA7l2mCWNIpG9mGCD8wGNIcPD7Txa" crossorigin="anonymous"></script> </head> <body> <h1>瀑布流</h1> </body> </html>
<div class="container" > <div class="row"> <div class="col-md-4"> <h2>Image00001</h2> <img src="https://unsplash.it/500/333?image=1" alt="" class="img-responsive"> </div> <div class="col-md-4"> <h2>Image00004</h2> <img src="https://unsplash.it/500/500?image=2" alt="" class="img-responsive"> </div> <div class="col-md-4"> <h2>Image00002</h2> <img src="https://unsplash.it/500/333?image=3" alt="" class="img-responsive"> </div> <div class="col-md-4"> <h2>Image00003</h2> <img src="https://unsplash.it/500/333?image=4" alt="" class="img-responsive"> </div> <div class="col-md-4"> <h2>Image00005</h2> <img src="https://unsplash.it/500/333?image=5" alt="" class="img-responsive"> </div> <div class="col-md-4"> <h2>Image00006</h2> <img src="https://unsplash.it/500/333?image=6" alt="" class="img-responsive"> </div> </div> </div>
二、引入
<script src="https://unpkg.com/masonry-layout@4/dist/masonry.pkgd.min.js"></script>
三、調用插件
<script> $(function(){ $('.masonry').masonry({ itemSelector: '.item' }); }); </script>
在 row 增加一個類別: masonry
在 col-md-4 增加一個類別 item
四、其他